|
|
      |
|
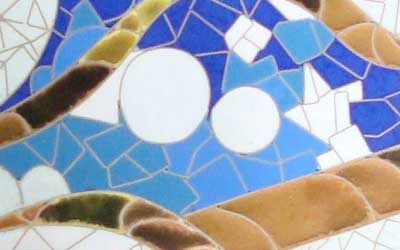
THE ART OF ENAMELING: CLOISONNÉ (Printer-friendly version) Part I: General procedures The following paper is meant to be a working outline for students of the cloisonné process. There is no one way to approach the technique and one must remain open to new and individual approaches—even, most fortunately, to new materials occasionally. So, on with it. Metals used: The metal bases most commonly used are of copper, fine silver, and gold. The average thickness of this metal runs from 16 to 20 gauge, depending on the object being made. All metal-working (sawing, punching, soldering, for instance) should be done before any enameling is carried out. Use a solder that has a melting point of about 1450F or higher (I-T solder melts at 1460F). If a cadmium solder is used be sure there is adequate ventilation. If the piece requires shaping or detailing, it is helpful to anneal the metal first. This may be done in the kiln by bringing it to red heat and then quenching the metal in water. Annealing will make simple engraving, hammering, and bending much easier. Before being enameled the metal must be cleaned. Use either a 3M green scrub sponge, cleansing powder, Sparex No.2, or PennyBrite, or a combination of these agents. If you are using copper, paint the back with Scalex after the metal is cleaned. This is an oxidation retardant, which means that the fire scale formed on the back in the firing process will peel away as the metal cools. This cuts out an extra cleaning step. The first firing will be the base coat on the front of the piece, which helps insure having a clean surface on which to develop the wire work. Once this base coat is fired, clean the back, apply counter enamel and fire the piece again. The enamel on the front should be applied in a thin-but-not-too-thin coat, which I know is confusing, and which takes practice to achieve. If the first coat is too thick, the wires will subsequently sink so far into the enamel that there is not enough room to fill the cloisons with color. If the coat is too thin it may burn out under silver or gold foil. The base coat—if transparent—should be fired to a clear bright color before wires are applied. The higher temperatures sometimes needed to clarify transparent base coats can damage silver wire or foil if the piece has to be high-fired later. Firings will vary in length of time according to kiln temperature and the maturation point of the enamels being used. Once silver wire is inlaid, the kiln should not go above the temperature at which silver melts. I keep my kiln at 1350F just to be sure I don’t melt those wires. Embedding other materials: Metal foils: Metal foils of either silver of gold are often applied in areas where the most vibrant color is desired. The general rule (probably made for breaking) is cool colors on silver and warm colors on gold. Actually almost anything goes with gold, but several of the warm colors do not work on silver. The foil is laid down with adhering solution (Klyr-fire) on a previously-fired enamel base, and the pieceis fired again. If air holes have formed under the foil, open them, place a small piece of foil on top, and refire (this step can be done in combination with filling other areas with color) Do feel free to combine steps—the fewer firings the better, I think. Two steps which may not be combined are those of firing the foil to the base coat and covering the foil with enamel. As the enamel on the top melts it will pull the loose edges of foil up and around itself making nasty little folk-wrapped packages of enamel. Both gold and silver foils can be burned. Silver will turn black if fired at too high a temperature, or sometimes when the base coat is very thin under the foil. Once the silver is burned, it is gone. Try covering burned silver foil with enamel, firing and placing another piece (called a paillon) down, and refiring. Gold, on the other hand, may turn dark and burned-looking, but when enamel is applied and fired, the gold comes back. No such luck with the silver. Gold and silver foil may be layered in one firing on top of each other, in which case the reticulate and form a pale yellow alloy. If you want the darker gold color on top of silver, lay down a thin layer of enamel on top of the previously fired paillon, fire, and then fire the second foil on top. (I have never tried firing foil on top of raw enamel, but I believe that Stel Shevis does it successfully. The first problem I see with this is lack of control of placement. It would need to be a situation in which that doesn’t matter. Try it. Practice.) With repeated firings foil will split. It is inherent in the process. Live with it. Or: it can be mended by placing new foil on top of the split. Usually by the time the splits appear, however, there are several layers of enamel on top of the foil, so the mend may appear to float. Sometimes a depression has formed in the split and that will show. Last, but what probably be your first consideration, foils are meant to be used primarily with transparent enamels. Wire mesh: Wire mesh may be embedded in enamel at various stages. It may be placed on a metal base and enamel sifted over it. Mesh may be placed on an enameled base with adhering solution and fired. It may be added in later firings. Once placed and fired, the mesh should have raw enamels worked into and under the mesh. Pitting is a problem with mesh and some of the air pockets can be eliminated by the above process. Mesh may be from old copper window screen, new screen (if you can find it), or you can weave your own of copper, silver or gold wire. Annealing ti gives good flexibility. The mesh may be entirely covered with transparent enamel for a gridwork underlay; it may be placed on top of the enamel and fired for a woven metal appearance, or it may extend both under and on top. When on to it presents a pleasing woven texture after it has been stone flat. Enamels: Enamels are opaque, transparent, or opalescent. In this age they are also either lead-bearing or lead-free, Lead-bearing enamels are being phased out in some places (especially in schools) for safety purposes. Enamels have different maturation points, but generally speaking these points are so close that they don’t cause problems. (One problem, however, is that enamels on top of each other which have very different characteristics can cause cracking. One advantage/disadvantage is the break-through of the bottom color into the top: advantage, because it gives a good visual texture; disadvantage, because that is not always what you want. For maximum control in handling enamels for cloisonné, the enamels are mixed with water. In the case of opaque enamels, a small amount of enamel may be placed in a plastic spoon and water is added. You will find your own best working consistency. In the case of transparents (and opalescents are treated like transparents) the enamels must be washed to eliminate the finest dust and any extraneous dirt which may have wandered in. If you have a medium-to-fine sifter, sift the transparents first, returning the finer grains to the original container. The heavier grains are then washed. In some areas of the country there is no problem in using tap water. If you live in the “black belt” or any area which has minerals or pollutants I suggest you use tap water first, switching to distilled water for at least the last three washings. If you store the washed enamels for a period of time, rewash several times with distilled water before using. If the water on the enamels is scummy or greasy-looking, throw the enamel out and begin again. The enamel has deteriorated and will not fire to bright clear color. Enamelists work with a fixed palette—what they send you is all you've got. But there are ways to change the colors. Transparents may be layered one over another, or feathered into each other for a softened color join, and the colors will blend. Opaques, on the other hand, if mixed, result in tiny dots of each color. This may certainly be used. Bear in mind that the color mix will be done by the viewing eye, as in what happens with a pointillist painting, and will not be a smooth color blending of the material itself. The cloisons are filled in a series of applications and firings. When the work is fired, the sand-like grains sink down and fill the air spaces among themselves, so the areas must be filled until the glass reaches the top of the wires. Good results so far as color placement is concerned occur if shading is done in a columnar manner, rather than in a layered, drifted process. If a layer of one color is used on top of another for shading or color change (as you would do for painting), it is possible in the final stoning process to remove or erase all that you have worked to put down, thus losing your color change. This “rule” is changeable—especially when you are working with transparents or opalescents. One color is seen through another, but you must still have a deep enough layer so that it won’t disappear in the stoning. In using transparents, the fixed palette is not quite so fixed. The colored glass will be changed by what is beneath it. Thus with one color you will have a change, depending if it is on bare copper, copper with an intermediate layer of colorless enamel on it, silver, gold, or another color. One rule to remember when shading with transparents is to start with the lighter color first. You can always add more, or a slightly darker color, but once the color is dark you cannot lighten it. (Think of trying to get a pastel color by adding white to a dark color. It is easier to start white and slowly darken the color. Takes less paint, too.) Finishing: Once the cloisons are filled and fired, the final step is that of finishing. Whether you want a matte finish or a glassy one, the workpiece must be stoned or ground until all wires are free of enamel, and the enamel itself is level with the wires. The tools used for this are alundum stones of 150, 220, and 320 grit, followed by sue of 220, 320, 400, 600, and sometimes 1500 grit wet/dry sandpaper. The process is one of stoning, sometimes refilling cloisons with more enamel, and refiring. Since the stoning process is tedious, it pays to take some time and care in filling the cloisons evenly in the first place. Remember that the stoning is similar to filing in that the work is gorund down to the desired level and then the rest of the process is one of removing scratches left by the preceding tool. I do try to avoid the 150 stone if working with leaded enamels, unless I have built up areas much too high. But the 150 stone is the best one to start with when using lead-free enamels which are much harder to grind. The larger grit (confusing, because the bigger grit has the smaller number) the faster it cuts, but the deeper the scratches left behind too. And if I have stoned across the piece with one grit, then I will turn the piece one-quarter turn, and stone perpendicular across the first scratches. This prevents any digging in more deeply of particles of the stone which may have been left behind. Stoning is best done under running water so that these loose particles of stone, enamel, or wire are flushed away and not embedded in pits or scratches. Flush the piece and your work area each time you change grits. This is important because if the piece is refired, bits of debris left on the enamel will fire in, forming tiny gray dots. These may be ground out with a flexible shaft tool, but it is best to avoid them in the first place. If you fire again after stoning, scrub the surface well before firing with a glass brush under running water. Two finishes:
Part II: Wire working for cloisonné Cloisonné wire used is usually gold, silver or copper. The gauges vary from 10 through 40. Gold and fine silver wire fires cleanly. Copper, of course, forms fire scale and needs cleaning. Wire can be either round or flat, with flat wire being the most commonly used. If you want a line with slight variations in the width, use round wire and stone the piece after the last firing. One or two governing principles come to mind immediately concerning design for cloisonné, and they come out of the character of the materials. The flat, ribbon wire will not stand on edge without a bend in it. And second, wires which run parallel with and close to the edge of the work piece can be easily cracked away. These two facts should be considered when designs are drawn. The second one can be controlled somewhat by very careful handling and always stoning in the direction of the wire's length. In most cases I prefer to work with un-annealed wire. Annealed wire is very soft and shows every little crimp. If you need to anneal the wire, I suggest you place it on a piece of fire brick or other clean, flat surface--not on a rack if your racks are glazed like mine have become--and anneal it in the furnace. I find I am much more attuned to furnace temperatures for silver rather than torch ones when annealing cloisonné wire, and the furnace heats more evenly for this process. Wire bending is done with fingers, tweezers, and sometimes mechanical means. A smooth wire line is achieved by bending with your fingers. Precise or smaller bends are done with tweezers. Tweezers with straight edges work best. The bend is made at right angles to the length of the wire, which helps the wire sit flat against the work piece base. If you need circles of one size, find a round dowel, pencil, metal rod, etc. and wrap the wire around it. the rod's diameter should be slightly smaller than hat of the needed circle, since the wire does spring back somewhat. If you have problems with the wire slipping, saw a slot across the end of the dowel and slip the end of the wire into it. That will catch and hold the wire securely. The spiral, spring-shaped wire are clipped, just as you would do when making jump rings. If you hand bend small circles grasp the wire at its end with the tweezers and drag or coil the loose end around in a circle. If you try to bend continuously along the wire, you will have small angles or crimp marks--especially if the wire is annealed. Flat ribbon wire: Most lines will have a curve or bend in them. Continuous, curving lines are graceful and pleasing to the eye. However, this does not mean that straight lines may not be used. The wire work in such a design may become more tricky as you work to achieve the desired effect. Four possible solutions for getting straight, single lines:
Note: The hooks should point in opposite directions because of the tendency for the enamel to pull a straight line with small hooks over on its side. More enamel on the inside of the piece, or having hooks going in two directions will help counteract that. Variations: Jagged lines: haphazardly crimp a length of wire, putting sharp bends in it. Then smooth it out by pulling it between your fingers. "Raindrops": Bead the end of the wire with the torch, forming a small ball. Holding the wire as it would be on the piece, gently file a flat edge on what would be the bottom of the bead so the wire will sit flat on the work piece. "Garlands": Bend the ribbon wire back on itself in a "V" and pinch the bend tightly together. Make a bead at the bend with the torch. This can be done at evenly spaced intervals and the wire then pulled out in a curve to make a decorative garland. You will need to use a gentle hand with forming the curves, since this wire will have been annealed in the beading/torching process. The smoothest curve will be achieved by holding the bead in the tweezers and pulling the other bead around, not by placing the tweezers on the wire between the beads and bending. Dotted lines: Place the cloisonné wire on the work piece and fire it to the base coat. Build up the enamel on both sides. Before the enamel is filled to the level of the wires, but after it has enough enamel to strengthen the wire, grind the wire down at intervals, using a flexible shaft machine and a small grinding tip. Clean up any ragged ends, then fill opaque enamel in an appropriate color over the low spaces. When the work is finished and stoned, the wire will appear as a dotted line. Once silver is placed on the work piece, DO NOT RUN THE FURNACE TEMPERATURE BEYOND 1400 F. 1350 F is even safer. (It depends on the calibration of your particular furnace.) At higher temperatures the silver will melt and the work is lost. Don't limit yourself. There is more than one way to skin a cat! Copyright 1994 Jean E. Tudor. All Rights Reserved. |